Easy Homemade Fruit Ice Pops: Your Healthy Summer Treat for Kids & Adults
As the temperatures rise and the sun shines brighter, there's nothing quite as satisfying as a frosty, fruit-filled ice pop to cool you down. Forget the store-bought versions loaded with artificial colors, flavors, and questionable sweeteners. Making your own homemade ice pops is a game-changer – a simple, healthy, and incredibly rewarding way to enjoy a refreshing treat. Whether you're a parent looking for nutritious snacks for your children or an adult seeking a guilt-free indulgence, these customizable fruit pops are the perfect answer. Packed with real fruit, naturally sweetened, and ridiculously easy to prepare, they bring a burst of summer straight from your freezer to your palate.Why Homemade Ice Pops Are Your Summer Essential
The appeal of crafting your own frozen delights goes far beyond just beating the heat. Homemade fruit ice pops offer a wealth of benefits that make them a must-have in your summer routine:- Uncompromised Health & Nutrition: The biggest advantage of making your own is complete control over ingredients. You use real, whole fruits – fresh or frozen – providing essential vitamins, minerals, and fiber. There's no need for artificial colors, preservatives, or high-fructose corn syrup, ensuring a truly healthy snack. It's also an ingenious way to sneak extra fruits (and even a few greens!) into your family's diet without them even knowing.
- Endless Customization & Flavor Exploration: The possibilities are truly limitless. From single-fruit purity to complex fruit medleys, creamy yogurt blends, or even vegetable-infused concoctions, your imagination is the only boundary. You can tailor them to specific tastes, dietary needs, or whatever fruits are in season and on sale.
- Budget-Friendly Fun: Store-bought pops can add up quickly, especially during peak summer. Making your own from scratch is significantly more economical, utilizing fruits you might already have on hand or buying them in bulk.
- Simple & Engaging Activity: The process of making homemade ice pops is incredibly straightforward and a fantastic activity to do with kids. They love choosing fruits, blending mixtures, and, of course, the anticipation of a frozen treat they helped create.
- Hydration Boost: Especially when using water, coconut water, or hydrating fruits like watermelon, these pops can contribute to your daily fluid intake, helping you stay refreshed and hydrated on hot days.
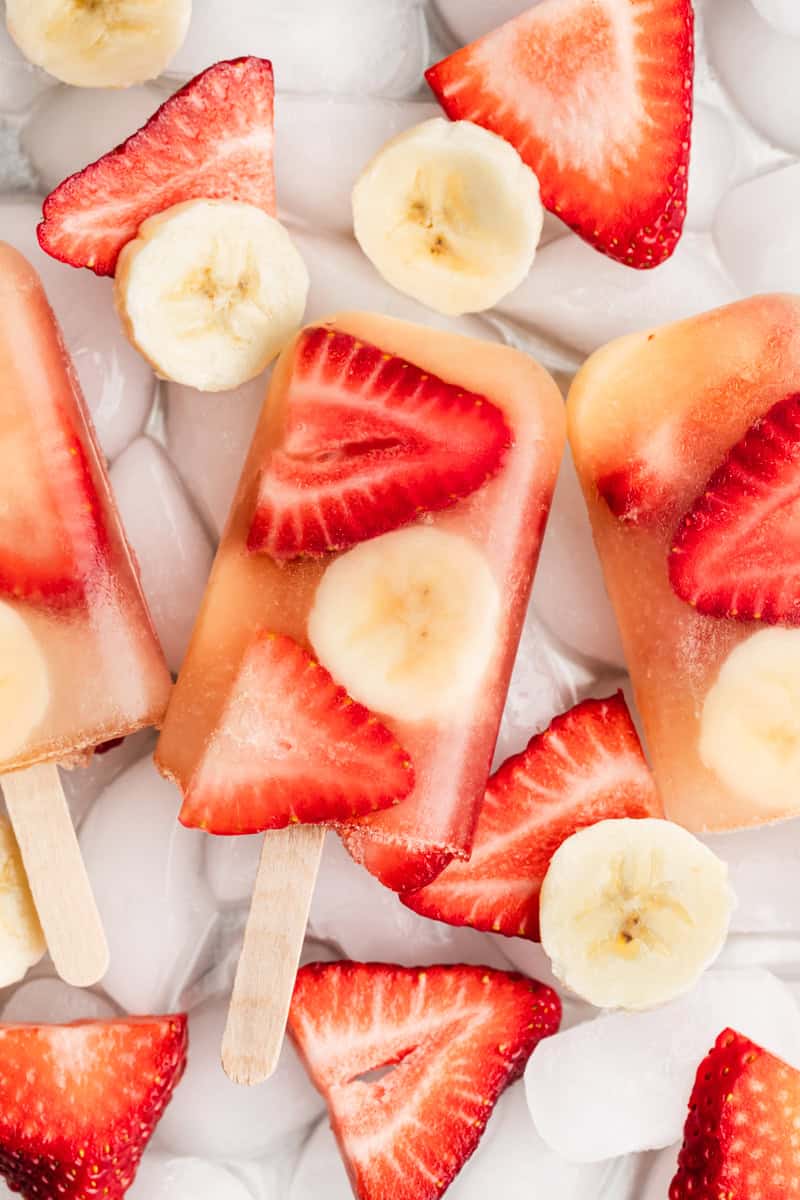
From leftover smoothies to a bounty of fresh berries, virtually any fruit can be transformed into a delicious homemade ice pop. It's a fun, healthy alternative that everyone will love.
Gearing Up: What You Need to Make Homemade Ice Pops
You might envision a complicated process or specialized equipment, but the beauty of making No Artificial Stuff: Healthy Fruit Ice Pops You Can Make At Home is its simplicity. You likely already have most of what you need in your kitchen:- A Reliable Blender: This is your most essential tool. A good blender will turn your fruits into a smooth, pourable mixture, ensuring a pleasant texture for your ice pops. Even a basic model will do the job perfectly.
- Ice Pop Molds: These come in a variety of shapes and materials.
- Classic Plastic Molds: Often come with built-in handles/sticks. They are durable and reusable.
- Silicone Molds: Flexible and non-stick, making it incredibly easy to remove the frozen pops. They come in various fun shapes.
- Ice Pop Pouches (Freezies): These plastic sleeves are excellent for on-the-go treats, mimicking the beloved "Otter Pops" or "freezies" of childhood. They take up less freezer space and are perfect for packing in lunchboxes or coolers.
- Small Cups/Dixie Cups: If you're just starting out or don't have dedicated molds, small paper cups with wooden sticks make a great impromptu alternative.
- Ice Pop Sticks: If your molds don't come with integrated handles, you'll need wooden popsicle sticks.
- A Funnel: While not strictly essential, a funnel makes pouring the fruit mixture into molds or pouches incredibly easy and mess-free, preventing sticky drips.
- Your Chosen Ingredients: The star of the show! Fresh or frozen fruits, a liquid base (water, juice, coconut water, milk, or yogurt), and optional natural sweeteners (honey, maple syrup, agave) or flavor boosters (vanilla extract, mint leaves).
With these basic supplies, you're ready to embark on your delicious journey into the world of homemade frozen treats.
Crafting Your Perfect Pop: A Step-by-Step Guide
Making delicious homemade ice pops is a straightforward process that anyone can master. Follow these simple steps to create your own refreshing summer treats:- Choose Your Flavor Profile & Ingredients: This is where the fun begins! Decide on your fruit combinations. Think about colors – bright red strawberry-banana, sunny yellow mango-pineapple, or deep purple blueberry-grape. You can use a single fruit, blend several, or even incorporate leftover smoothie mixtures. For an extra creamy texture, consider adding a splash of coconut milk, almond milk, or Greek yogurt. If your fruit isn't naturally sweet enough for your liking, a touch of honey, maple syrup, or stevia can be added. For inspiration and specific recipe ideas, don't forget to check out our guide on Customize Your Homemade Ice Pops: Simple Fruit Recipes for All.
- Blend It to Perfection: Place all your chosen ingredients into your blender. Blend until the mixture is completely smooth and free of large chunks. If you prefer a chunkier pop, you can reserve a few small pieces of fruit to stir in after blending. If the mixture is too thick to pour, add a little more liquid (water, juice, or milk) until it reaches a pourable consistency.
- Pour Carefully into Molds: Using your funnel, carefully pour the fruit mixture into your ice pop molds or pouches. Be sure not to overfill them; leave a little space at the top (about half an inch) to allow for expansion as the mixture freezes. If using traditional molds, insert your popsicle sticks now.
- Freeze & Enjoy: Place your filled molds or pouches into the freezer. Freezing time will vary depending on the size of your molds and your freezer's temperature, but typically it takes anywhere from 4-8 hours, or ideally, overnight, for the pops to solidify completely.
Pro Tip for Easy Release: If your ice pops are stubborn and don't want to slide out of the molds, run the outside of the mold under warm water for 15-30 seconds. This will slightly melt the outer layer, making removal effortless.
Flavor Adventures: Inspiring Homemade Ice Pop Ideas
The beauty of homemade ice pops lies in their versatility. Here are some inspiring combinations, building on classic favorites and offering new twists:- Tropical Sunshine Pops: A vibrant blend of fresh or frozen mango, pineapple, and a splash of orange juice. This combination is wonderfully sweet, tangy, and incredibly hydrating – like a vacation on a stick!
- Berry Blast Antioxidant Pops: Combine ripe strawberries, tart cherries, a ripe banana for creaminess, and a touch of pomegranate juice. The result is a deep red, antioxidant-rich treat that's bursting with juicy flavor.
- Creamy Peach Dream Pops: Blend sweet peaches (fresh or frozen), ripe bananas, and a generous splash of coconut milk for a luxuriously creamy and naturally sweet pop that feels incredibly indulgent.
- Sneaky Green Power Pops: For a healthy twist, combine baby spinach with pineapple, mango, and banana. Don't worry, the fruit's sweetness completely masks the spinach flavor, giving you all the nutrients with none of the "green" taste. It's a fantastic way to boost nutrient intake!
- Immunity Boosting Pops: Create a soothing pop ideal for sore throats or a general immune boost. Ingredients like elderberry syrup, a spoonful of local honey, lemon juice, and even a hint of grated ginger can make a comforting and beneficial frozen treat.
- Watermelon Mint Refresher: Simple yet incredibly refreshing! Blend fresh watermelon chunks with a few fresh mint leaves and a squeeze of lime juice. Strain for a smoother texture if desired.
Experiment with what you have! Overripe fruits are often the sweetest and perfect for blending into pops. Remember, the goal is natural goodness, so embrace fresh, real ingredients.
Tips for Success and Storage
To ensure your homemade ice pop experience is always a delightful one, keep these tips in mind:- Sweetness Adjustment: Always taste your mixture before freezing. The sweetness will be slightly muted when frozen, so it's okay for it to taste a little sweeter than you'd normally drink.
- Prevent Icy Texture: If your pops turn out too icy, you might need more sugar or fat (like coconut milk or yogurt) in your mixture. These ingredients help prevent large ice crystal formation.
- Longevity: How long do homemade ice pops last in the freezer? Generally, all-fruit pops made with fresh ingredients will retain their best flavor and texture for up to 2-3 weeks in an airtight container or freezer bag. While they can last longer, the quality might start to decline.
- Batch Freezing: Make larger batches! If you have the freezer space, doubling or tripling your recipe means you'll have a ready supply of healthy treats for weeks. Once frozen solid, you can remove them from their molds and store them in freezer-safe bags or containers to free up your molds for the next batch.
